
Using the Atomos Ninja is a great way to leverage the high-quality raw video output from a Sony FX3. By configuring your camera and Atomos Ninja V correctly, you can access the full potential of this powerful combination, including recording to ProRes RAW, which has many benefits in post-production for VFX and color grading.
Parts List
The Essentials
These are the bare minimum that you'll need to get up and running.
| Part | Link |
|---|---|
| Camera: Sony FX3 | Check Price |
| External Recording: Atomos Ninja 5.2" | Check Price |
| HDMI Cable: 4K HDMI to HDMI Coiled Cable | Check Price |
Recommended optional add-ons
These are some optional add-ons that make your experience using the Atomos Ninja a bit more pleasant. The ANDYCINE Lunchbox is a great way to rehouse your SSD drive to make it both more rugged and a bit smaller allowing for better airflow to the Ninja.
| Part | Link |
|---|---|
| SSD Adapter: ANDYCINE LunchBox II | Check Price |
| SSD: Samsung 870 EVO 2TB | Check Price |
| USB-C Adapter: ANDYCINE USB-C to SATA Adapter for Lunchbox | Check Price |
| Monitor Mount: SMALLRIG Field Monitor Mount | Check Price |
Recommended V-Mount Battery Setup
Using a V-Mount external battery setup will guarantee that both your FX3 and Atomos Ninja have exactly the same battery life. Otherwise, you'll need to keep a close eye on both batteries to make sure that one doesn't go out before the other.
| Part | Link |
|---|---|
| V-Mount Battery: FXLION Nano V-Mount Battery (98Wh) | Check Price |
| Camera Power: D-Tap to NP-FZ100 Dummy Battery | Check Price |
| Atomos Power Cable: D-Tap to Locking 2.5mm DC | Check Price |
| Atomos Power Adapter: AtomX Battery Eliminator | Check Price |
Ok, so now let's get started.
Sony FX3 Configuration
Configuring your Sony FX3 for external ProRes RAW recording is a straightforward process that guarantees peak image performance.
Navigate in the menu to:
Setup > External Output > HDMI Output Settings
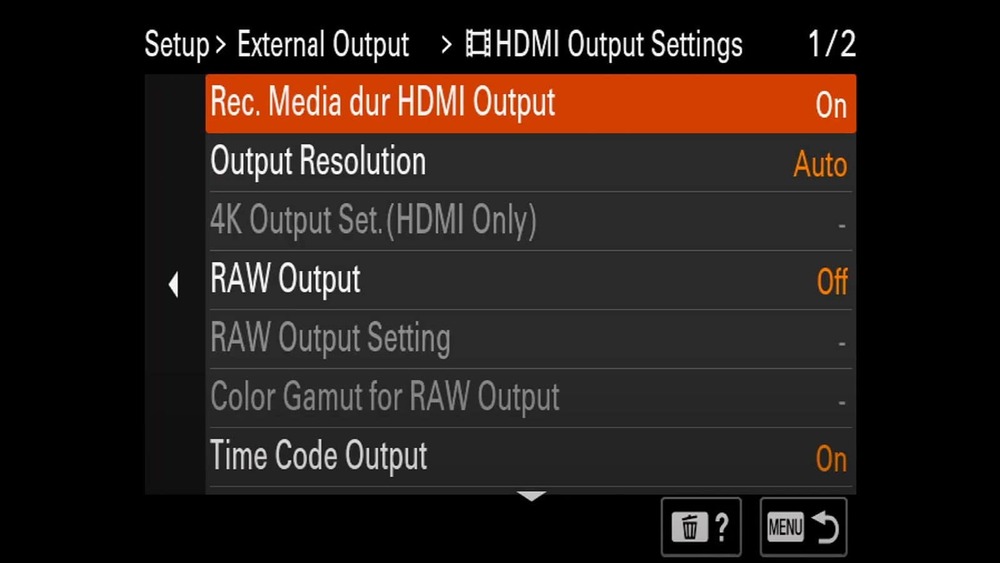
• Rec Media dur HDMI Output: On
This will allow the camera to record internally at the same time as the Atomos records externally. Always good to have a backup.
• RAW Output: On
This is what allows us to output the raw video signal to the Atomos Ninja.
• RAW Output Setting: 24p
Choose the appropriate frame frame for your project. For most, this will be 24 fps.
• Color Gamut for RAW Output: S-Gamut3.Cine/S-Log3
The raw video signal will always use S-Log 3, but you can choose between S-Gamut3 or S-Gamut3.Cine. Most people choose S-Gamut3.Cine.
• Time Code Output: On
Timecode is always a good thing to have. Especially if you're using a dedicated timecode generator box or syncing with a separate audio recording or other cameras.
• REC Control: On
This setting allows the FX3 to tell the Atomos Ninja when to start recording so that when you hit the record button on the FX3 the Ninja records as well.
• 4ch audio output: CH1/CH2
This defaults to sending audio channels 1 and 2 via HDMI. If you need to send channels 3 and 4, you can change that setting here. For most, the default setting is fine.
Now connect your FX3 to the Atomos Ninja via HDMI cable, and let's get the Ninja configured.
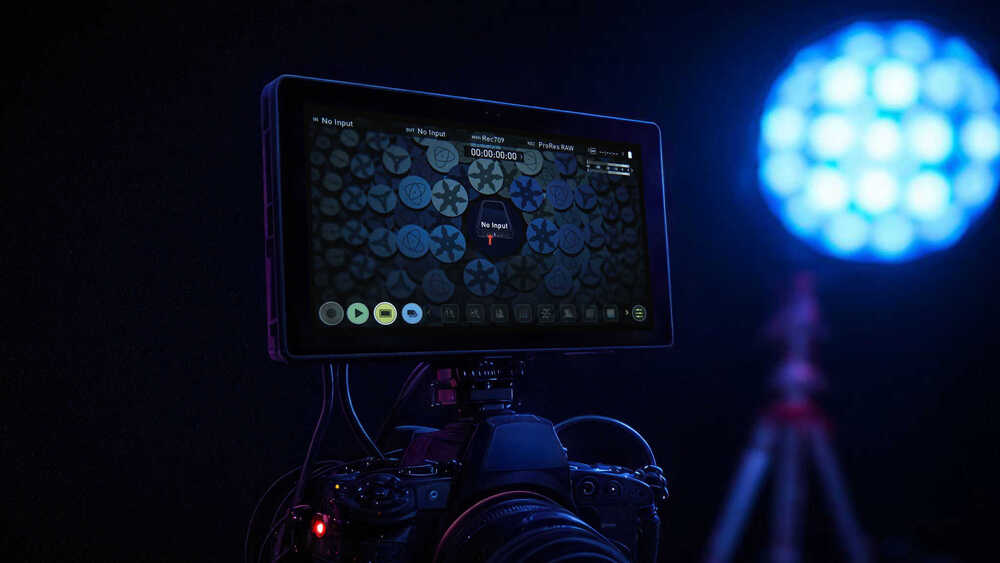
Atomos Ninja Setup
Setting up your Atomos Ninja V for ProRes RAW recording is just as important as properly configuring your Sony FX3.
On the Ninja V's source page, select HDMI for input and set the HDMI standard to 2.0 for compatibility. Enable the trigger to allow the camera to control recording.
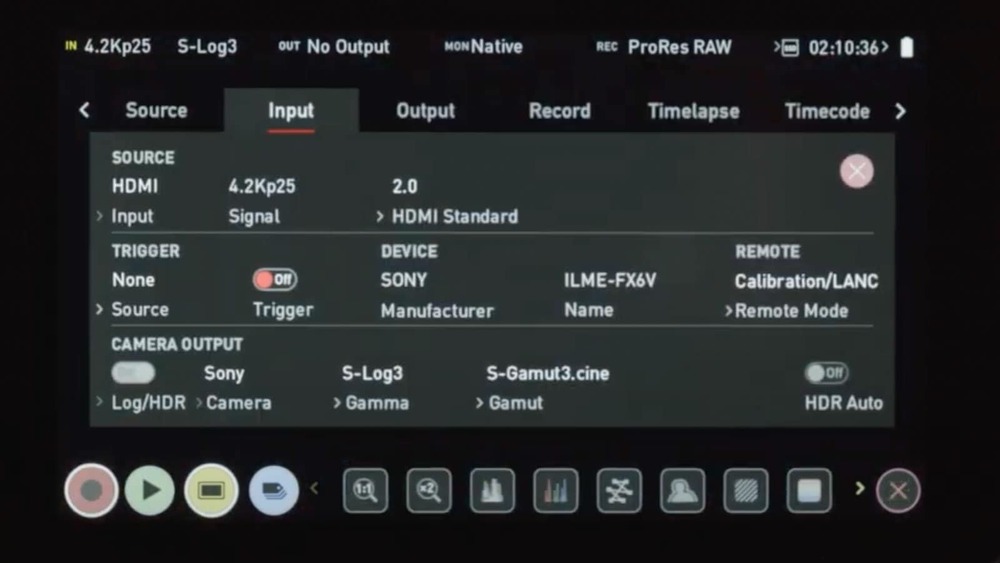
Most settings will be automatically configured by the FX3 (or other Sony cameras), but it's essential to confirm you have the latest firmware installed for peak performance.
Next, tap on the Record tab.
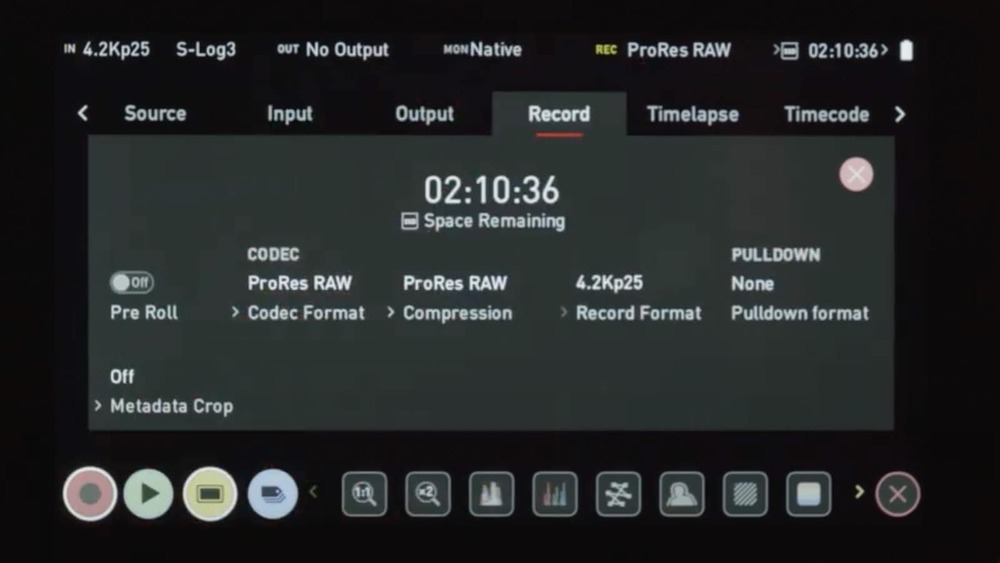
Now you can set your Codec and compression level
• Codec Format: ProRes RAW
• Compression: ProRes RAW / ProRes RAW HQ
For most users, the ProRes RAW setting is a good compromise of quality and data rate. But if you are filming VFX shots, such as green screen content or low-light footage, then the extra data in ProRes RAW HQ might be warranted.
• Record Format: 4.2Kp24
This frame rate should match the fps you chose in the FX3 menu RAW Output Setting
• Pulldown format: none
Unless you have a specific reason to change it, leave this set to none.
• Metadata Crop: Off
We leave this setting set to off because we want the full maximum resolution available. This extra resolution can come in handy later for reframing shots if needed. But if you find that post-workflow too tedious, you can change this setting.
• Pre Roll: Off
This option will give you 6 seconds of pre-recording from the moment you press record. So, if you're shooting live sports or other unpredictable subject matter then you might want to toggle this option on.
Keep in mind that ProRes RAW files are considerably larger than XAVC S-I, so make sure you've got ample storage capacity. ProRes RAW's 12-bit color depth preserves incredible image fidelity for editing flexibility.
When shooting, manage exposure manually and stick to base ISO levels of 640 and 12,800 for the cleanest results.
Consider employing noise reduction techniques in post-production to further refine your footage if needed.
Monitor Viewer Options:
You have several options to choose from for your monitor viewer settings:
- Native
- Rec709
- HLG
- PQ
- LUT
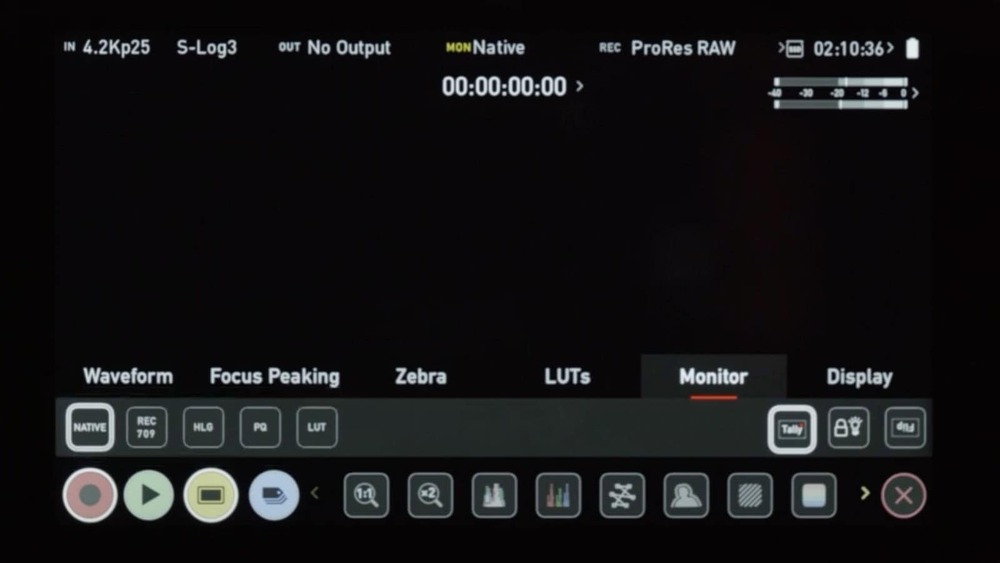
In general you'll probably want to use PQ or LUT. PQ will show you the full dynamic range of of your RAW signal, so you can properly judge your exposure and guard against clipping your highlights. The LUT option will allow you to upload your own custom LUT files so that you can preview your image with a creative look applied.
Please note that these settings only affect what you see on the Atomos Ninja monitor, they do not have any effect on the recorded image which will be in S-Gamut3.Cine/S-Log3 as you setup in your FX3.
Storage Considerations
You'll quickly realize that ProRes RAW files devour storage space at an alarming rate. Shooting even a few minutes can generate gigabytes of data, so you'll need ample high-speed storage to keep up with the demands of ProRes RAW.
SSDs like the Samsung 870 EVO are ideal for their speed and portability, but you may want to modify them for use with the ANDYCINE Lunchbox housing. This involves disassembling the drive to access the M-SATA, which can be risky and void your warranty.
However, the benefits of fast offloads and smooth playback in post-production often outweigh the risks. Just be sure to budget for plenty of storage and consider the potential downsides of drive modifications before diving in.
Shooting Tips
Once you've got your storage sorted, it's time to put that ProRes RAW power to work. For the best image quality, try to stick to the FX3's dual base ISO levels of 640 and 12,800. This minimizes noise while maximizing dynamic range. ProRes RAW allows you to capture the full dynamic range of the sensor, but don't be afraid to underexpose slightly to protect highlights.
| Scenario | ISO |
|---|---|
| Bright Daylight | 640 |
| Overcast Day | 640-1250 |
| Night / Low Light Interior | 12,800 |
In color grading, you can easily brighten shadows, recover highlights, and adjust white balance. ProRes RAW's flexibility lets you fine-tune exposure later, so you can focus more on composition and creativity while shooting.
Post-Production Advantages
ProRes RAW really shines in post-production. One of the biggest advantages is the ability to adjust ISO and white balance after the fact. Plus, the colorists and VFX artists welcome the extra color data provided.
This enhanced flexibility lets you make significant corrections in post, saving shots that might otherwise be unusable. While it doesn't replace getting your settings correct in-camera, ProRes RAW provides a valuable safety net and creative freedom that can elevate your projects to the next level.
Conclusion
You now have the knowledge to master Sony FX3 ProRes RAW techniques. You've learned the essential camera configurations, recorder setup, and ideal recording settings. You're equipped with shooting tips to capture stunning footage and understand the post-production advantages ProRes RAW offers. With these techniques at your fingertips, you're ready to release the full potential of your Sony FX3 and create engaging high-quality content. Go forth and push your creativity to new heights!
Frequently Asked Questions
How Does Prores RAW Compare to Other RAW Formats Like Blackmagic RAW?
Compared to Blackmagic RAW, ProRes RAW offers similar flexibility in post-production. It's less efficient in compression but maintains excellent image quality. ProRes RAW is widely compatible with editing software, but is not compatable with Blackmagic's Davinci Resolve while Blackmagic RAW is not compatable with FCPX without the use a 3rd party tool.
Can I Use Autofocus When Shooting Prores RAW on the Sony FX3?
Yes, you can use autofocus when shooting ProRes RAW on the Sony FX3. The camera's AF system remains fully functional, letting you take advantage of its advanced focusing capabilities while recording high-quality raw footage.
What Is the Maximum Recording Time for Prores RAW on the Ninja V?
You can record up to 145 minutes of ProRes RAW on a 1TB SSD with the Ninja V. The exact recording time depends on the ProRes RAW codec, the frame rate you're using and the size of your storage.
Is It Possible to Record Prores RAW Internally on the Sony FX3?
No, you can't record ProRes RAW internally on the Sony FX3. It's only possible via the HDMI output to an external recorder like the Atomos Ninja V that supports ProRes RAW recording.
How Does the Low-Light Performance of Prores RAW Compare to XAVC S-I?
ProRes RAW's low-light performance is similar to XAVC S-I, but if you want similar noise reduction you'll need to perform that cleanup in post-production. Stick to base ISO levels of 640 and 12,800 for the best results when shooting.
Tools For Indie Filmmakers
We're in beta. If you want to help us figure out what works, we'd like that.